sugar glider care
Creating a sugar glider bonding pouch at home is one of the easiest ways to strengthen trust and build a close connection with your glider.
These small, cozy pouches let your sugar glider stay close to your scent, helping them feel safe and calm while you move around.
A DIY option doesn’t just save money, it also gives you full control over the materials, comfort, and safety features that matter most.
With the right fabric, proper stitching, and secure ventilation, you can craft a pouch that feels just as warm and protective as store-bought versions.
This guide walks you through every step so you can confidently create a bonding pouch your glider will love.
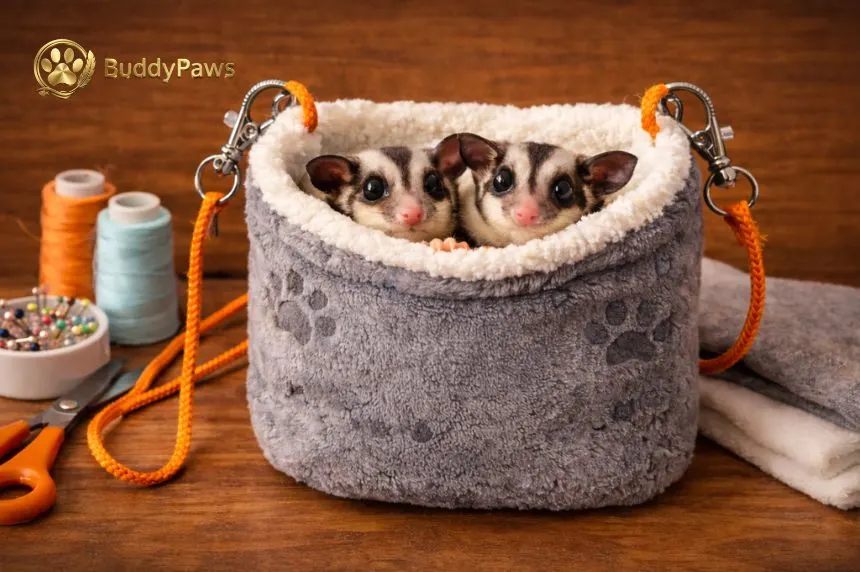
A sugar glider bonding pouch is a soft, secure fabric pouch designed to help you keep your glider close while building trust.
It lets your sugar glider rest safely against your body, absorbing your scent and warmth, two things that make bonding easier.
These pouches usually feature breathable fabric, reinforced stitching, and a secure closure to keep your glider comfortable and protected during movement.
In sugar glider care, bonding pouches play a major role because they help shy or new gliders feel calm while adjusting to their owner.
Over time, regular pouch time strengthens familiarity and deepens your relationship.
Bonding pouches create a safe, comforting space that supports natural marsupial bonding behaviors.
By keeping your sugar glider close to your scent and warmth, the pouch helps build familiarity, reduce stress, and strengthen trust over time.
Sugar gliders rely heavily on scent for connection. Staying in a pouch close to your body helps them recognize your smell, creating a sense of safety and building deeper trust during early bonding stages.
A secure, fabric-enclosed environment mimics the safe feeling of a nest. This reduces anxiety, especially for new gliders learning to adapt to a new home and routine.
For small exotic pets like sugar gliders, slow, consistent exposure is key. Bonding pouches let you spend time together without overwhelming them, helping them adjust to your presence at a comfortable pace.
Keeping your glider close during your day creates predictable interactions. This routine teaches them you’re safe, patient, and consistent, three things sugar gliders naturally respond to when forming long-term bonds.
Using a pet lover's app lets you log bonding time, track behavior changes, and monitor your glider’s comfort levels. This helps you recognize improvements and adjust your bonding routine effectively.
Making a safe bonding pouch starts with choosing the right materials. Good supplies protect your glider, support bonding, and pair well with proper glider diet routines and overall daily care.
Fleece is the safest and most comfortable option for sugar gliders. It doesn’t fray, stays warm, and prevents tiny claws from getting caught, keeping your glider secure inside the pouch.
Polyester thread holds up well against stretching, washing, and daily use. It’s durable enough to withstand your glider’s movement without tearing or loosening, making the pouch long-lasting.
Breathable mesh ensures safe airflow while adding a sense of cage enrichment by giving your glider visibility. Proper ventilation reduces heat buildup and keeps your glider comfortable during bonding sessions.
Use snaps, buttons, or a drawstring instead of zippers, which can pinch delicate skin or tails. A smooth, secure closure keeps your glider safe while you’re on the move.
An app for pet lovers can help you track pouch use, bonding sessions, and behavior changes. It’s a simple way to monitor progress and adjust your bonding routine as needed.
Building a sugar glider bonding pouch at home is easier than most new owners expect.
With simple materials and steady steps, you can create a safe, cozy pouch that strengthens bonding and supports daily trust-building.
Cut two identical fleece rectangles, usually around 8×10 inches. This size gives your glider enough space to curl up comfortably while still keeping the pouch secure and portable.
Cut small openings and sew in mesh panels for airflow. Good ventilation keeps the pouch cool, reduces humidity buildup, and ensures your glider can breathe safely while inside.
Place the two fleece pieces with the soft sides facing inward. Pin them together along the edges, leaving a small top opening to form the pouch’s entrance.
Use strong polyester thread to sew around the edges. A tight stitch prevents tearing and supports safe sugar glider care, especially for gliders that like to wiggle or scratch.
Strengthen the top edge with a folded seam. This gives the pouch structure, makes it comfortable for your glider, and keeps the opening from stretching out over time.
Install snaps or a drawstring, never a zipper. Safe closures prevent accidental pinching and allow you to open the pouch smoothly during bonding sessions.
Sew on sturdy loops so the pouch can hang comfortably on a lanyard or inside a carrier. This helps you keep your glider close throughout the day.
Use an app for pet lovers to log bonding time, check behavior patterns, and track pouch use. This helps you refine routines and support smoother bonding sessions.
Using a homemade bonding pouch safely ensures your sugar glider stays protected, calm, and comfortable.
A few simple precautions help prevent accidents and make every bonding session positive and stress-free for both of you.
Check ventilation daily to ensure airflow stays clear and comfortable for your glider.
Inspect stitching often to catch loose threads that could trap tiny claws.
Avoid rough movement while wearing the pouch to keep your glider calm and secure.
Keep the pouch upright to prevent accidental rolling or pressure.
Clean the pouch regularly to maintain hygiene and reduce odor buildup.
A well-made sugar glider bonding pouch is more than a cozy accessory; it’s one of the most effective tools for building trust and helping your glider feel safe around you.
When you use it consistently and safely, your scent, warmth, and presence become familiar and comforting.
This makes bonding smoother, especially for new or shy gliders learning to adjust to a new home.
By choosing safe materials, reinforcing seams, and keeping ventilation strong, you create a pouch your glider can rely on daily.
Over time, these quiet bonding moments strengthen your relationship and help your sugar glider feel calmer, happier, and more connected to you.
Loading blogs...